4.Web Server Construction
事前作業
1.studentユーザでログインして、rootユーザに変更します。
$ su -
パスワード:tokyoec
#
1.Apacheのインストール
CentOS8_WORDPRESSの仮想マシンで実行すること
1.httpdのインストール
# dnf -y install httpd
メタデータの期限切れの最終確認: 0:14:25 時間前の 2020年02月05日 00時58分25秒 に 実施しました。
依存関係が解決しました。
================================================================================
 パッケージ        Arch   バージョン                            Repo      サイズ
================================================================================
インストール:
 httpd             x86_64 2.4.37-16.module_el8.1.0+256+ae790463 AppStream 1.7 M
依存関係のインストール:
 apr               x86_64 1.6.3-9.el8                           AppStream 125 k
 apr-util          x86_64 1.6.1-6.el8                           AppStream 105 k
 centos-logos-httpd
                   noarch 80.5-2.el8                            AppStream  24 k
 httpd-filesystem  noarch 2.4.37-16.module_el8.1.0+256+ae790463 AppStream  35 k
 httpd-tools       x86_64 2.4.37-16.module_el8.1.0+256+ae790463 AppStream 103 k
 mod_http2         x86_64 1.11.3-3.module_el8.1.0+213+acce2796  AppStream 158 k
弱い依存関係のインストール:
 apr-util-bdb      x86_64 1.6.1-6.el8                           AppStream  25 k
 apr-util-openssl  x86_64 1.6.1-6.el8                           AppStream  27 k
モジュールストリームの有効化:
 httpd                    2.4

トランザクションの概要
================================================================================
インストール  9 パッケージ

ダウンロードサイズの合計: 2.3 M
インストール済みのサイズ: 6.6 M
パッケージのダウンロード:
(1/9): apr-util-bdb-1.6.1-6.el8.x86_64.rpm      135 kB/s |  25 kB     00:00
(2/9): apr-util-openssl-1.6.1-6.el8.x86_64.rpm  258 kB/s |  27 kB     00:00
(3/9): centos-logos-httpd-80.5-2.el8.noarch.rpm 334 kB/s |  24 kB     00:00
(4/9): apr-util-1.6.1-6.el8.x86_64.rpm          266 kB/s | 105 kB     00:00
(5/9): apr-1.6.3-9.el8.x86_64.rpm               281 kB/s | 125 kB     00:00
(6/9): httpd-filesystem-2.4.37-16.module_el8.1. 419 kB/s |  35 kB     00:00
(7/9): httpd-tools-2.4.37-16.module_el8.1.0+256 652 kB/s | 103 kB     00:00
(8/9): mod_http2-1.11.3-3.module_el8.1.0+213+ac 571 kB/s | 158 kB     00:00
(9/9): httpd-2.4.37-16.module_el8.1.0+256+ae790 842 kB/s | 1.7 MB     00:02
--------------------------------------------------------------------------------
合計                                            760 kB/s | 2.3 MB     00:03
トランザクションの確認を実行中
トランザクションの確認に成功しました。
トランザクションのテストを実行中
トランザクションのテストに成功しました。
トランザクションを実行中
  準備             :                                                        1/1
  インストール中   : apr-1.6.3-9.el8.x86_64                                 1/9
  scriptletの実行中: apr-1.6.3-9.el8.x86_64                                 1/9
  インストール中   : apr-util-bdb-1.6.1-6.el8.x86_64                        2/9
  インストール中   : apr-util-openssl-1.6.1-6.el8.x86_64                    3/9
  インストール中   : apr-util-1.6.1-6.el8.x86_64                            4/9
  scriptletの実行中: apr-util-1.6.1-6.el8.x86_64                            4/9
  インストール中   : httpd-tools-2.4.37-16.module_el8.1.0+256+ae790463.x8   5/9
  scriptletの実行中: httpd-filesystem-2.4.37-16.module_el8.1.0+256+ae7904   6/9
  インストール中   : httpd-filesystem-2.4.37-16.module_el8.1.0+256+ae7904   6/9
  インストール中   : centos-logos-httpd-80.5-2.el8.noarch                   7/9
  インストール中   : mod_http2-1.11.3-3.module_el8.1.0+213+acce2796.x86_6   8/9
  インストール中   : httpd-2.4.37-16.module_el8.1.0+256+ae790463.x86_64     9/9
  scriptletの実行中: httpd-2.4.37-16.module_el8.1.0+256+ae790463.x86_64     9/9
  検証             : apr-1.6.3-9.el8.x86_64                                 1/9
  検証             : apr-util-1.6.1-6.el8.x86_64                            2/9
  検証             : apr-util-bdb-1.6.1-6.el8.x86_64                        3/9
  検証             : apr-util-openssl-1.6.1-6.el8.x86_64                    4/9
  検証             : centos-logos-httpd-80.5-2.el8.noarch                   5/9
  検証             : httpd-2.4.37-16.module_el8.1.0+256+ae790463.x86_64     6/9
  検証             : httpd-filesystem-2.4.37-16.module_el8.1.0+256+ae7904   7/9
  検証             : httpd-tools-2.4.37-16.module_el8.1.0+256+ae790463.x8   8/9
  検証             : mod_http2-1.11.3-3.module_el8.1.0+213+acce2796.x86_6   9/9

インストール済み:
  httpd-2.4.37-16.module_el8.1.0+256+ae790463.x86_64
  apr-util-bdb-1.6.1-6.el8.x86_64
  apr-util-openssl-1.6.1-6.el8.x86_64
  apr-1.6.3-9.el8.x86_64
  apr-util-1.6.1-6.el8.x86_64
  centos-logos-httpd-80.5-2.el8.noarch
  httpd-filesystem-2.4.37-16.module_el8.1.0+256+ae790463.noarch
  httpd-tools-2.4.37-16.module_el8.1.0+256+ae790463.x86_64
  mod_http2-1.11.3-3.module_el8.1.0+213+acce2796.x86_64

完了しました!
2.httpdのバージョン確認
# httpd -v
Server version: Apache/2.4.37 (centos)
Server built:   Dec 23 2019 20:45:34
3.httpdの自動起動設定
# systemctl enable httpd
Created symlink /etc/systemd/system/multi-user.target.wants/httpd.service → /usr/lib/systemd/system/httpd.service.
# systemctl list-unit-files --type=service | grep httpd
httpd.service                              enabled
httpd@.service                             disabled
4.httpdの起動
# systemctl start httpd
# systemctl status httpd
● httpd.service - The Apache HTTP Server
   Loaded: loaded (/usr/lib/systemd/system/httpd.service; enabled; vendor preset: disabled)
   Active: active (running) since Thu 2020-02-06 05:23:53 EST; 6s ago
     Docs: man:httpd.service(8)
 Main PID: 6763 (httpd)
   Status: "Started, listening on: port 80"
    Tasks: 213 (limit: 23984)
   Memory: 34.8M
   CGroup: /system.slice/httpd.service
           tq6763 /usr/sbin/httpd -DFOREGROUND
           tq6764 /usr/sbin/httpd -DFOREGROUND
           tq6765 /usr/sbin/httpd -DFOREGROUND
           tq6766 /usr/sbin/httpd -DFOREGROUND
           mq6767 /usr/sbin/httpd -DFOREGROUND

 2月 06 05:23:53 localhost.localdomain systemd[1]: Starting The Apache HTTP Server...
 2月 06 05:23:53 localhost.localdomain httpd[6763]: AH00558: httpd: Could not reliably determine the server's fully qualified domain name, using localhost.l>
 2月 06 05:23:53 localhost.localdomain systemd[1]: Started The Apache HTTP Server.
 2月 06 05:23:53 localhost.localdomain httpd[6763]: Server configured, listening on: port 80
 //[q]キーを入力して終了
5.外部からアクセスできるようにfirewalldでhttpを解放
# firewall-cmd --add-service=http --zone=public --permanent
success
6.設定を反映
# firewall-cmd --reload
success
2.Apacheのセキュリティ設定~Welcomeページの非表示~
1.welcome.confの設定変更
# vim /etc/httpd/conf.d/welcome.conf -----------------------------------以下赤字の設定を行います。--------------------------------------------- # # This configuration file enables the default "Welcome" page if there # is no default index page present for the root URL. To disable the # Welcome page, comment out all the lines below. # # NOTE: if this file is removed, it will be restored on upgrades. # #//←#を付けてコメントアウト # Options -Indexes //←#を付けてコメントアウト # ErrorDocument 403 /noindex/index.html //←#を付けてコメントアウト # //←#を付けてコメントアウト Alias /noindex /usr/share/httpd/noindexOptions MultiViews DirectoryIndex index.html AddLanguage en-US .en-US AddLanguage es-ES .es-ES AddLanguage zh-CN .zh-CN AddLanguage zh-HK .zh-HK AddLanguage zh-TW .zh-TW LanguagePriority en ForceLanguagePriority Fallback AllowOverride None Require all granted -----------------------[Esc + :wq]で保存終了します。----------------------------------------------------
2.httpdをリロード
# systemctl reload httpd
3.Apacheのセキュリティ設定~ディレクトリリスティングの無効~
1.DocumentRootディレクトリに移動
# cd /var/www/html
2.任意のディレクトリとファイルを作成
# mkdir test
# touch test.html
# ls
test  test.html
1.httpd.confファイルのバックアップ
# cp -p /etc/httpd/conf/httpd.conf /etc/httpd/conf/httpd.conf.org
2.httpd.confファイルの設定変更
# vim /etc/httpd/conf/httpd.conf --------------------------------以下の赤字の変更を行います。---------------------------------------------- ・ ・省略 ・ # Further relax access to the default document root:# # Possible values for the Options directive are "None", "All", # or any combination of: # Indexes Includes FollowSymLinks SymLinksifOwnerMatch ExecCGI MultiViews # # Note that "MultiViews" must be named *explicitly* --- "Options All" # doesn't give it to you. # # The Options directive is both complicated and important. Please see # http://httpd.apache.org/docs/2.4/mod/core.html#options # for more information. # Options FollowSymLinks //←「Options Indexes FollowSymLinks 変更⇒ Options FollowSymLinks」 # # AllowOverride controls what directives may be placed in .htaccess files. # It can be "All", "None", or any combination of the keywords: # Options FileInfo AuthConfig Limit # AllowOverride None # # Controls who can get stuff from this server. # Require all granted ・ ・省略 ・ -----------------------[Esc + :wq]で保存終了します。----------------------------------------------------
3.httpdをリロード
# systemctl reload httpd
4.Apacheのセキュリティ設定~Traceメソッドの無効化とレスポンスヘッダのバージョン表示無効化~
1.DocumentRootディレクトリに移動
# cd /var/www/html
2.任意のhtmlファイルの作成
# vim index.html
--------------以下の内容をコピー&ペーストします。-------
<!DOCTYPE html>
<html>
<head>
<meta charset="utf-8">
<title>test page</title>
</head>
<body>
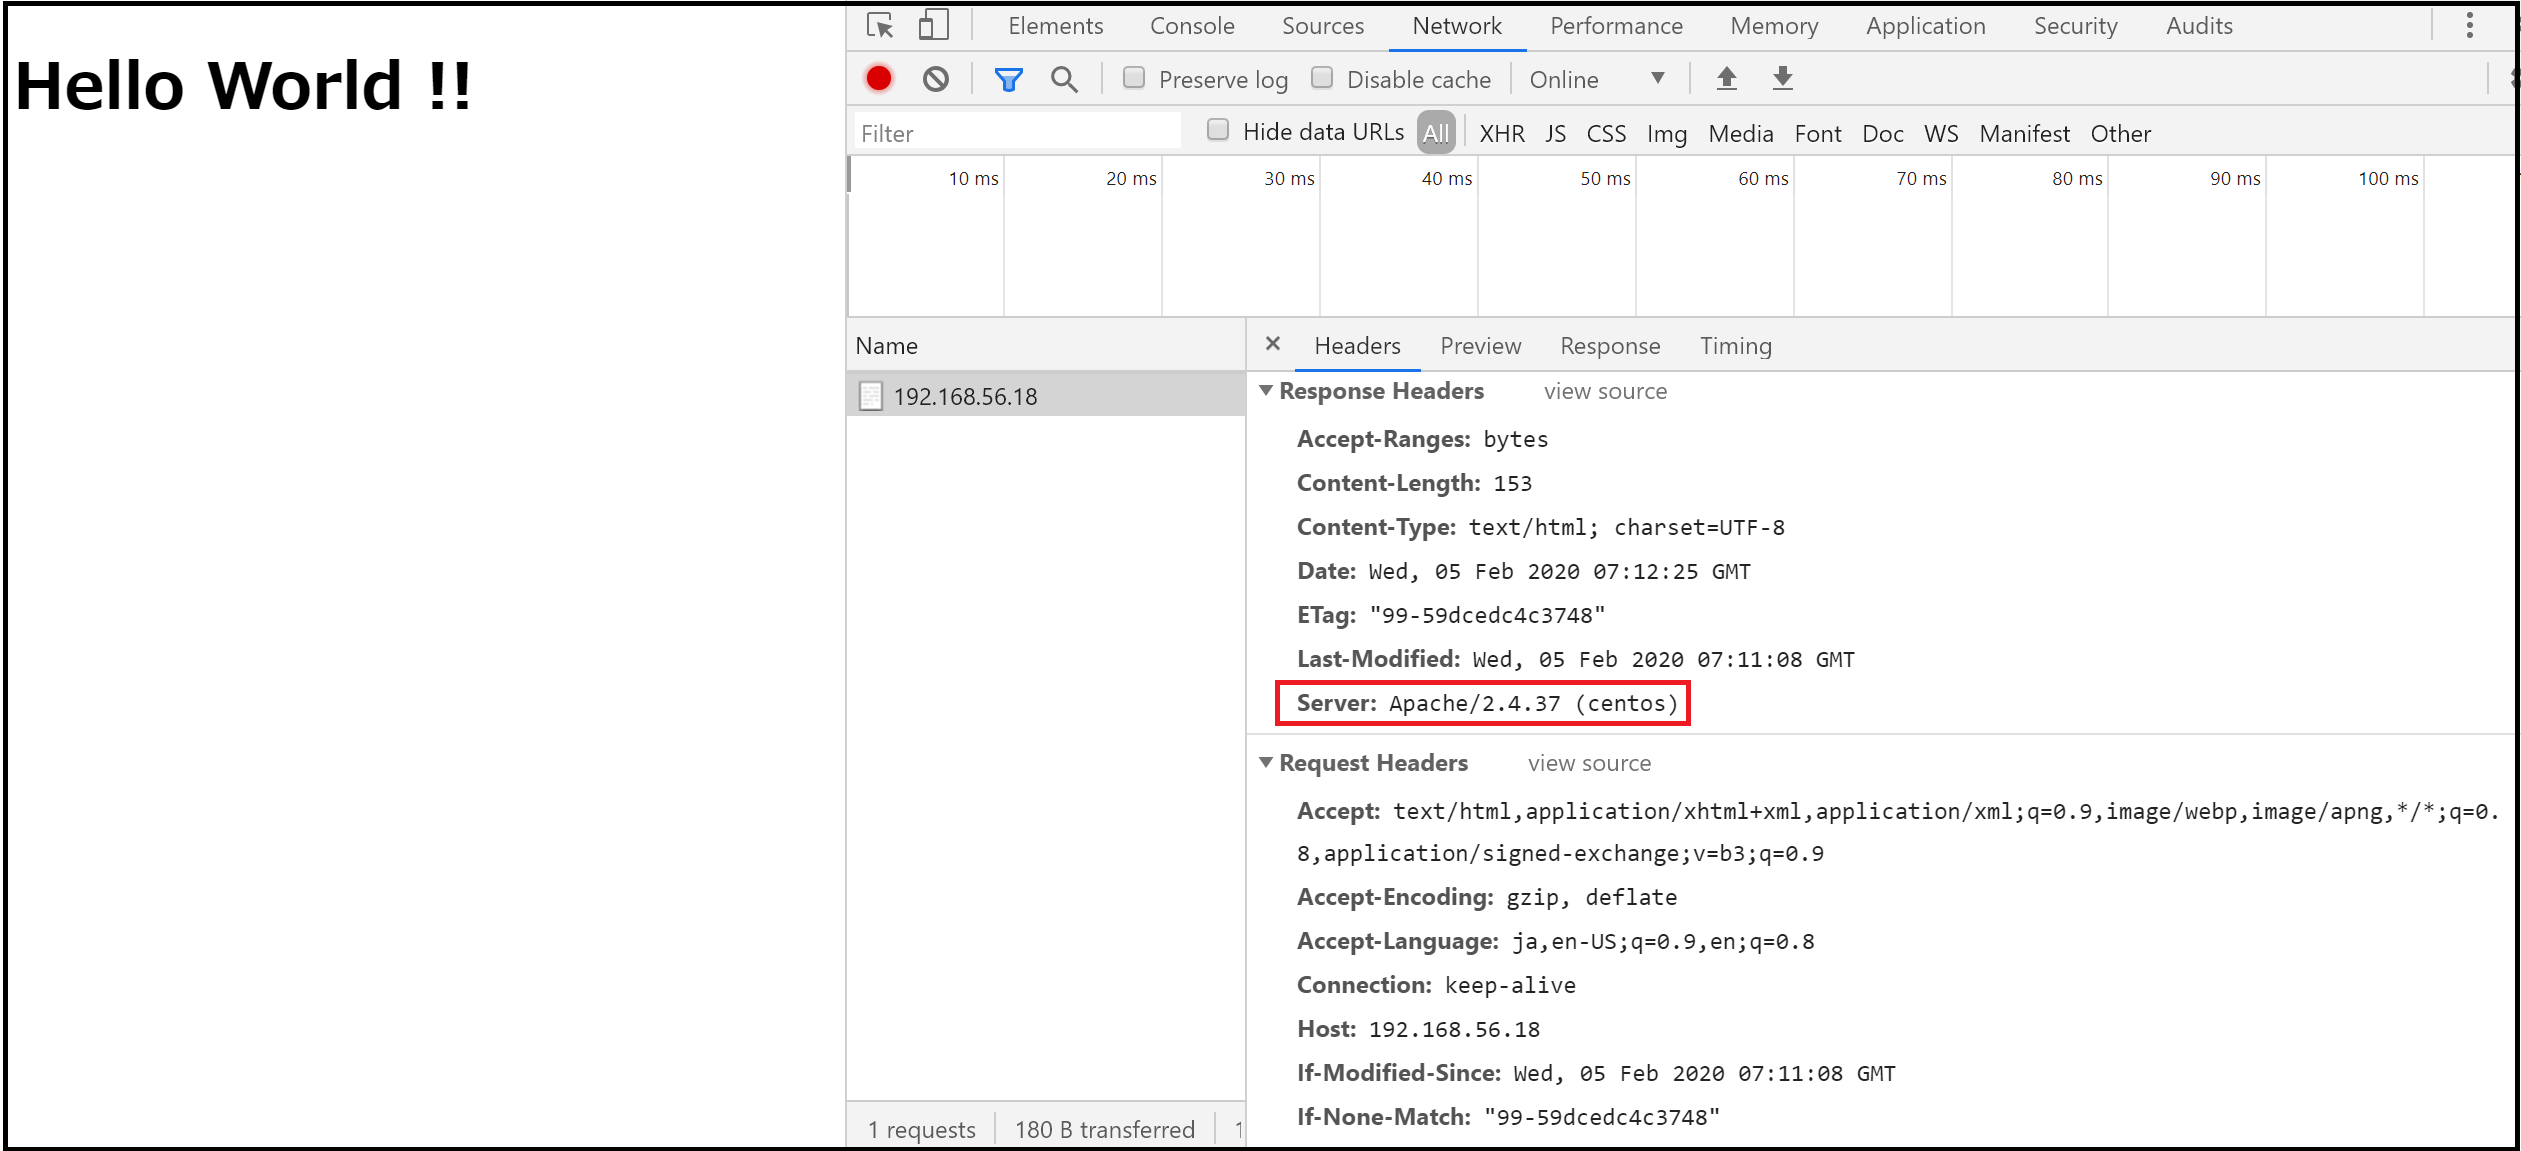
<h1>Hello World !!</h1>
</body>
</html>
---------------[Esc + :wq]で保存終了します。----------
3.Google Chromeのデバッグツールで確認
Chrome起動後右クリック[検証]、192.168.56.28にアクセス、[Network]-[192.168.56.28]アイコンをクリック、Response Headersを確認。
1.ディレクトリ移動
# cd /etc/httpd/conf.d
2.「security.conf」の作成
# vim security.conf

--------------以下の内容をコピー&ペーストします。-------
# Trace Method off
TraceEnable Off

# Hide Response Header Version information
ServerTokens Prod
---------------[Esc + :wq]で保存終了します。----------
3.httpdをリロード
# systemctl reload httpd
5.HTTPS通信
1.Openssl、mod_sslをインストール
# dnf -y install openssl mod_ssl
CentOS-8 - AppStream                            9.5 kB/s | 4.3 kB     00:00
CentOS-8 - Base                                 8.6 kB/s | 3.8 kB     00:00
CentOS-8 - Extras                               2.2 kB/s | 1.5 kB     00:00
CentOS-8 - PowerTools                           6.0 kB/s | 4.3 kB     00:00
Extra Packages for Enterprise Linux 8 - x86_64  9.1 kB/s | 6.2 kB     00:00
パッケージ openssl-1:1.1.1c-2.el8.x86_64 は既にインストールされています。
依存関係が解決しました。
================================================================================
 パッケージ
           Arch     バージョン                                Repo        サイズ
================================================================================
インストール:
 mod_ssl   x86_64   1:2.4.37-16.module_el8.1.0+256+ae790463   AppStream   131 k

トランザクションの概要
================================================================================
インストール  1 パッケージ

ダウンロードサイズの合計: 131 k
インストール済みのサイズ: 308 k
パッケージのダウンロード:
mod_ssl-2.4.37-16.module_el8.1.0+256+ae790463.x 551 kB/s | 131 kB     00:00
--------------------------------------------------------------------------------
合計                                            217 kB/s | 131 kB     00:00
トランザクションの確認を実行中
トランザクションの確認に成功しました。
トランザクションのテストを実行中
トランザクションのテストに成功しました。
トランザクションを実行中
  準備             :                                                        1/1
  インストール中   : mod_ssl-1:2.4.37-16.module_el8.1.0+256+ae790463.x86_   1/1
  scriptletの実行中: mod_ssl-1:2.4.37-16.module_el8.1.0+256+ae790463.x86_   1/1
  検証             : mod_ssl-1:2.4.37-16.module_el8.1.0+256+ae790463.x86_   1/1

インストール済み:
  mod_ssl-1:2.4.37-16.module_el8.1.0+256+ae790463.x86_64

完了しました!
2.秘密鍵を作成
# cd /etc/httpd/conf
# openssl genrsa -aes128 1024 > server.key
Generating RSA private key, 1024 bit long modulus (2 primes)
......................+++++
...+++++
e is 65537 (0x010001)
Enter pass phrase:tokyoec //←「tokyoec」と入力して[Enter]キー
Verifying - Enter pass phrase:tokyoec //←「tokyoec」と入力して[Enter]キー
3.公開鍵を作成
# openssl req -new -key server.key > server.csr
Generating RSA private key, 1024 bit long modulus (2 primes)
......................+++++
...+++++
e is 65537 (0x010001)
Enter pass phrase:tokyoec //←「tokyoec」と入力して[Enter]キー
Verifying - Enter pass phrase:tokyoec //←「tokyoec」と入力して[Enter]キー
[root@tokyo-ec ~]# openssl req -new -key server.key > server.csr
Enter pass phrase for server.key:
You are about to be asked to enter information that will be incorporated
into your certificate request.
What you are about to enter is what is called a Distinguished Name or a DN.
There are quite a few fields but you can leave some blank
For some fields there will be a default value,
If you enter '.', the field will be left blank.
-----
Country Name (2 letter code) [XX]:JP //←「JP」と入力して[Enter]キー
State or Province Name (full name) []:Tokyo //←「Tokyo」と入力して[Enter]キー
Locality Name (eg, city) [Default City]:Toshimaku //←「Toshimaku」と入力して[Enter]キー
Organization Name (eg, company) [Default Company Ltd]: //←[Enter]キー
Organizational Unit Name (eg, section) []:192.168.56.28 //←「192.168.56.28」と入力して[Enter]キー
Common Name (eg, your name or your server's hostname) []: //←[Enter]キー
Email Address []: //←[Enter]キー

Please enter the following 'extra' attributes
to be sent with your certificate request
A challenge password []: //←[Enter]キー
An optional company name []: //←[Enter]キー
4.秘密鍵と公開鍵で証明書を作成
# openssl x509 -in server.csr -days 36500 -req -signkey server.key > server.crt
Signature ok
subject=C = JP, ST = Tokyo, L = Toshimaku, O = Default Company Ltd, OU = 192.168.56.28
Getting Private key
Enter pass phrase for server.key: //←「tokyoec」と入力して[Enter]キー
5.パスフレーズの解除
# mv server.key server.key.bak
# openssl rsa -in server.key.bak > server.key
Enter pass phrase for server.key.bak:tokyoec //←「tokyoec」と入力して[Enter]キー
writing RSA key
6.ssl.confのバックアップ
# cp -p /etc/httpd/conf.d/ssl.conf /etc/httpd/conf.d/ssl.conf.org
7.ssl.confに設定
# vim /etc/httpd/conf.d/ssl.conf

-------------------------以下の赤字の変更を行います。----------------------------------------------------------------------------------
・
・省略
・
#   Point SSLCertificateFile at a PEM encoded certificate.  If
#   the certificate is encrypted, then you will be prompted for a
#   pass phrase.  Note that restarting httpd will prompt again.  Keep
#   in mind that if you have both an RSA and a DSA certificate you
#   can configure both in parallel (to also allow the use of DSA
#   ciphers, etc.)
#   Some ECC cipher suites (http://www.ietf.org/rfc/rfc4492.txt)
#   require an ECC certificate which can also be configured in
#   parallel.
SSLCertificateFile /etc/httpd/conf/server.crt //←「SSLCertificateFile /etc/pki/tls/certs/localhost.crt 変更⇒ SSLCertificateFile /etc/httpd/conf/server.crt」

#   Server Private Key:
#   If the key is not combined with the certificate, use this
#   directive to point at the key file.  Keep in mind that if
#   you've both a RSA and a DSA private key you can configure
#   both in parallel (to also allow the use of DSA ciphers, etc.)
#   ECC keys, when in use, can also be configured in parallel
SSLCertificateKeyFile /etc/httpd/conf/server.key //←「SSLCertificateKeyFile /etc/pki/tls/private/localhost.key 変更⇒ SSLCertificateKeyFile /etc/httpd/conf/server.key」
・
・省略
・
---------------------------------[Esc + :wq]で保存終了します。----------------------------------------------------------------------
8.SECLEVELの設定変更
# cp -p /etc/crypto-policies/config /etc/crypto-policies/config.org
# vim /etc/crypto-policies/config

---------------------------以下の赤字の変更を行います。--------------------------------------------------------------------------------
# This file should contain a single keyword, the crypto policy to
# be applied by default to applications. The available policies are
# restricted to the following profiles.
#
# * LEGACY: Ensures maximum compatibility with legacy systems (64-bit
#   security)
#
# * DEFAULT: A reasonable default for today's standards (112-bit security).
#
# * FUTURE: A level that will provide security on a conservative level that is
#   believed to withstand any near-term future attacks (128-bit security).
#
# * FIPS: Policy that enables only FIPS 140-2 approved or allowed algorithms.
#
# After modifying this file, you need to run update-crypto-policies
# for the changes to propagate.
#
LEGACY //←「DEFAULT 変更⇒ LEGACY」
---------------------------------[Esc + :wq]で保存終了します。----------------------------------------------------------------------
# update-crypto-policies
Setting system policy to LEGACY
Note: System-wide crypto policies are applied on application start-up.
It is recommended to restart the system for the change of policies
to fully take place.
9.httpdの再起動
# systemctl restart httpd
10.外部からアクセスできるようにfirewalldでhttpsを解放
# firewall-cmd --add-service=https --zone=public --permanent
success
11.設定を反映
# firewall-cmd --reload
success